Showing posts with label Sci-Fi. Show all posts

Thursday, 7 July 2016

Steel Lightning: Cadian 25th Assault Engineer company


A Warhammer 40K campaign started at our club, which has been generated a lot of excitement and been very successful in mobilizing many veteran gamers to dig up their old armies. This has certainly happened to me, and I have even found myself painting new additions to my already quite extensive collection of Imperial Guard (or whatever they're called nowadays).

In a flurry of nocturnal painting I finished a platoon of veteran guardsmen I had assembled maybe 5-6 years ago and tuned up their transports with some battle damage. I had originally assembled the force because I thought the theme was cool, so it's a nice surprise that they now constitute a "formation" in 40K, which get some nice bonuses to boot. Score!

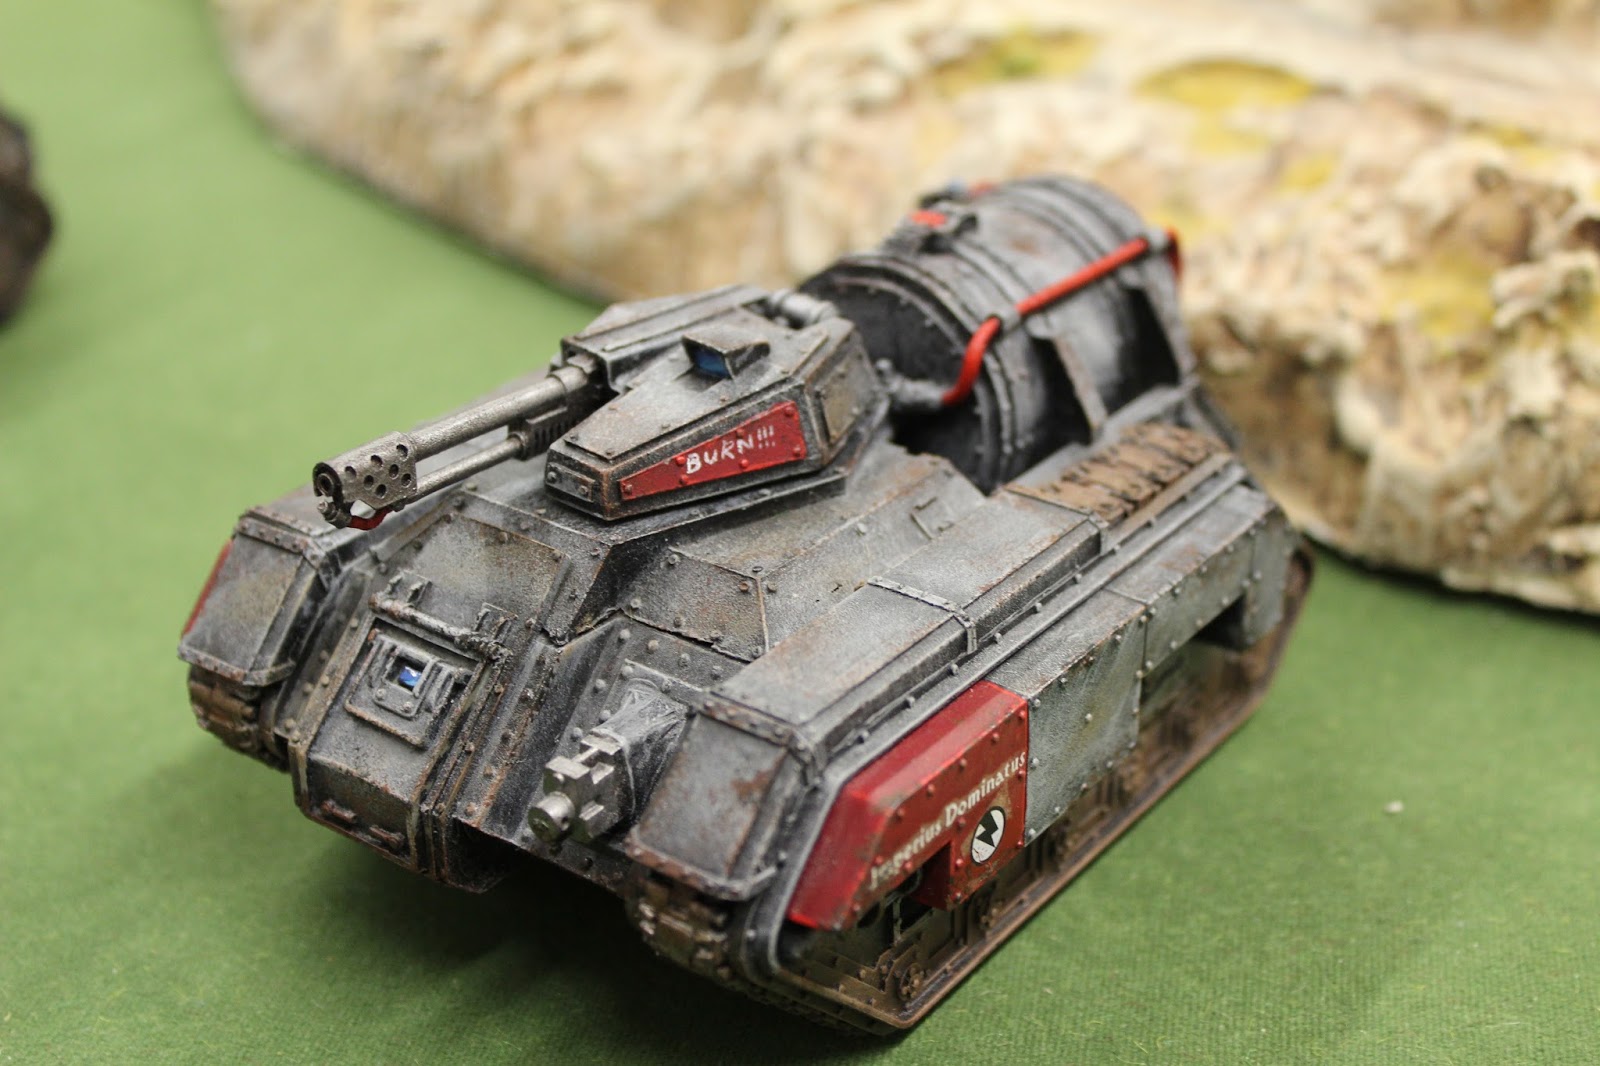
The 25th Assault Engineer company is a separate formation that is permanently attached to the Cadian 6th Armoured Regiment. Their tasks are manifold: clearing and bridging obstacles, escorting the regiment's Leman Russ battle tanks, securing objectives and assaulting fortified enemy positions. The veterans are armed with shotguns, meltaguns, meltabombs, flamers, demolition charges and other "tools of the trade". Each squad is mounted on a Chimera APC and the platoon is supported by two Hellhound flame-thrower tanks. The company is commanded by Major Steele, a hardened veteran with almost as many bionic replacements than "original" parts.


1st squad

2nd squad

Major Steele with his command squad

Squad 3

The platoon's AFVs

One of the battle-worn Chimeras

A Hellhound from Forge World

Saturday, 18 June 2016

Star Wars Armada: Encounter at base NS-207B


Admiral Dracip stood unmoving on the command deck of his Star Destroyer, Retribution. The greying veteran was lost deep in thought. Where could the Rebel fleet be? Dracip's task force had received orders to intercept and destroy a Rebel fleet active in the sector. The elusive enemy had already captured a number of Imperial supply convoys, but had thus far managed to evade Imperial patrols.

The Admiral's brooding was disrupted by a cough and some rustling from behind. There stood captain Krik, the fleet's chief intelligence officer. How long had the dark haired subaltern been there? Dracip disliked Krik, who was a cunning little thing that knew a bit too much and was probably out to supplant the elderly admiral. Unfortunately, Krik was too well connected to get rid off, and Dracip had to grudgingly admit that the younger man was good at what he did.

"What is it!?" Dracip barked.

"Sir, I have them!" The subaltern beamed proudly, undoubtedly taking credit for his underling's hard work. "My informants have indicated that the Rebel fleet plans to resupply at a remote space station on the fringes of the Nuthra system. A long range scan of the system indicates that several ships have indeed entered the area."

"Excellent! We must move out at once. Assemble the fleet and plot a course to this base. We shall wait until the Rebels have brought in their entire fleet and then come out of hyper space as close as possible. The enemy won't escape us this time!"

The encounter at base NS-207B

We played a scenario where the objective of both sides was to control the space station in the centre, while destroying as much of the opposing fleet as possible. I played the Imperials, fielding three Victory I class Star Destroyers (Retribution, Justice and Sentinel), 7 squadrons of Tie Fighters and 2 squadrons of Tie Bombers. The Rebel fleet consisted of an Assault Frigate Mark II (their flagship), two Nebulon B Frigates, a Corelian Corvette, two squadrons of A-wings, a squadron of X-wings, squadron of B-wings and squadron of Y-wings. The Rebels had the initiative (going first).

The Imperial manoeuvre catches the rebel scum off-guard (again)!

The opposing fleets close in on space station NS-207B

Imperial Star Destroyers advance menacingly

The Rebel fleet is a more motley assortment of ships

Space station NS-207B

This game was powered by Imperial lager

The Imperial fleet came out hyper space exactly as planned. The three Star Destroyers advancing side by side were a menacing sight, which threw the Rebels off guard. However, the supplies on station NS-207B were too valuable for the Rebels to abandon, and so they sped forward. In no time, the Rebel fleet had converged around the station and loading of the supplies could commence. The smaller, faster ships of the Rebel fleet were moving at great speed and started to bank right, with the obvious plan to by-pass and wheel around the imposing wall of death projected by the Star Destroyers' forward batteries. The Assault Frigate advanced more cautiously, apparently planning to defend the station while the supplies would be loaded.

On the Imperial side, Justice and Retribution advanced as fast as they could towards the station, whilst Sentinel on the right followed more slowly. Swarms of Tie Fighters were deployed and they hovered in front of the Star Destroyers, screening the capital ships from the Rebel bombers. As soon as the enemy came within range, the Tie Fighters sped forward to engage the Rebel squadrons. In no time at all, the Rebel squadrons were engaged and slowly both sides started to lose fighters.

Both sides scramble for the space station. The faster Rebel ships reach the target first.

Star Destroyer Sentinel, on the right flank, had misinterpreted the Rebel's plan and gets left behind.

Tie Fighter ace "Mauler" Mithel engages the Rebel A-wings

While the fighters engaged each other, the capital ships of both fleets continued on their trajectories. The Imperial Star Destroyers lumbered towards the space station whilst the lighter Rebel ships veered right. A few shots were traded at long range, but it was not long before the fleets clashed violently and true carnage could begin. The Star Destroyers were at their most effective at close range, while the nimble Rebel ships would have preferred to snipe at the enemy from long range.

The Corelian Corvette took a few heavy hits which dropped its shields, but the real punishment of the Imperial fleet was meted on one of the Nebulon-B Frigates, which lingered too long in the killing ground formed by the firing sector of two Star Destroyers. The Rebel captain tried to frantically weave left and right to avoid the shots, redirected his shields to the threatened sector and, when those efforts failed, attempted to increase speed to get out of the fire. It was all to no avail, and the short but deadly concentration of fire incinerated the overwhelmed frigate. The second Rebel frigate and the Corelian Corvette made it through the gauntlet and got round to the rear of the Star Destroyers. 

All hell breaks loose in the centre

One Rebel ship is destroyed, but the remaining Nebulon-B Frigate and Corelian Corvette make it to the Imperial rear.


However, the Rebel fleet had teeth of its own, and the Star Destroyers too started to feel the hurt. The Rebels chose to concentrate their fire against the Imperial capital ship, Retribution, which was situated in the middle of the Imperial line. Retribution was hit particularly hard by the close-range fire of the Assault Frigate, which continued loading supplies from the space station. Retribution returned fire and the squadrons of Tie Bombers started making bombing runs against the large Rebel ship. Star Destroyers Justice and Sentinel started to move up on either flank of the Rebel flagship. Meanwhile, the Tie Fighters had gained the upper hand against the less numerous rebel squadrons and slowly but surely eradicated the enemy fighters one by one. The Imperial fleet also gained control of the space station as their fleet began closing in from all sides.

The flagships of both fleets are locked in a deadly duel.

As the Corvette and Nebulon-B Frigate wheeled around the Imperial line, the predicament of Star Destroyer Retribution got worse. There was insufficient room for the Imperial flagship to manoeuvre past the Rebel's Assault Frigate, which kept pummelling its hapless prey from point-blank range. The ship's shields were down and the crew was hard pressed to put out the numerous small fires that had sprung up whilst trying to repair the ships systems, which were failing one by one. The lighter Rebel ships threw in their fire from the rear, which sealed the Star Destroyer's fate. With its hull breached in a dozen places, Admiral Dracip ordered all crew to abandon ship. Proud and standing tall, the admiral refused to abandon his station. One by one the lights flickered out and the engines died down. Slowly, the airless hulk continued on its trajectory and drifted off to space.

Star Destroyer Retribution is destroyed, followed shortly after by the Rebel flagship.

Remaining Rebel squadrons are swamped and destroyed.

The Rebels' elation was short lived, however, as they were in trouble of their own. Star Destroyers Justice and Sentinel drifted forward on either side of the large Rebel flagship, taking the beleaguered ship in a deadly crossfire. The hunter had become the hunted, and now it was the Rebel ships turn to frantically seek an escape from this trap. It was too late, however, to escape the wrath of the Star Destroyers. A well concentrated fire knocked out the Assault Frigate's shields on either flank, leaving the flagship a sitting duck. Sensing the inevitable, the captain attempted to contact the Imperial ships to negotiate a surrender.

The Imperial fleet did not heed this plea. It has been suggested that the Rebel ship's transmitters had been knocked out and that the plea for mercy never got through. Others say that the Imperial ships refused to accept the surrender. What the truth is, we don't know. What we do know is that a final, massive bombardment took the Rebel ship in both flanks simultaneously and that one of these rounds penetrated the ships reactors. The overheating reactors went critical and the Rebel fleet's capital ship disappeared in a brilliant explosion.

This was too much for the remaining Rebel ships: the remaining Nebulon-B Frigate and a Corelian Corvette. The Imperial Star Destroyers began wheeling about to engage the smaller ships and the Tie Fighters, having dispatched the remaining Rebel squadrons, moved to engage the capital ships. A few more shots were traded, but to little effect. The Rebel ships manoeuvred for a while and plotted the course for a hyper jump out of the system. In a flash, the remnants of the Rebel fleet activated their hyper drives and disappeared. The Nuthra system had been pacified - for now.


The Star Destroyers begin wheeling to engage the remaining Rebel ships


The Rebel ships move to escape

Imperial ships closing in, the Rebel ships engage their hyper drives and make a jump out of the system.

Sunday, 29 May 2016

Star Wars Armada: The Empire Strikes Back


I managed to squeeze in another game of Star Wars Armada last night. This time we had more ships, and now I was the "old hand" showing my friend how the game works. The game was a straightforward "free for all" between the two fleets. The Rebel fleet, consisting of two Nebulon B frigates, a Corelian cruiser and four squadrons of X-wings, had been collecting supplies at a remote star system when it ran into an Imperial force of two Star Destroyers, 6 squadrons of Tie Figthers and two squadrons of Tie Bombers.


The Rebels started the battle by advancing rapidly and confidently. The Corelian corvette in the centre sped towards the hulking Star Destroyers at maximum speed. The Nebulon B frigate on its left advanced more slowly while the one on its right fanned to the right, starting a wide flanking manoeuvre. The Star Destroyers advanced slowly while the swarms of Tie Fighters hovered nearby, ready to speed towards the enemy.


The Rebel's were soon to realize the folly of their battle plan, as the corvette came within range of both of the Star Destroyers short-range turbolasers. The devastating volleys raked the small ship, which rapidly lost its shields and started taking critical hits. The captain of the corvette panicked and veered to the right. This her second mistake, as the manoeuvre kept the small ship exposed to the withering fire for what seemed an eternity. Smelling blood, the two squadrons of Tie Bombers raced forward to finish their prey. A few proton torpedoes was all it took, and the rebel ship was no more.


The other flights of Tie Fighters also sped forward to engage the X-Wings. The Nebulon B frigates opened fire against the Star Destroyers and dropped some of their shields. However, the fire was too sporadic to have much of an effect.


The Star Destroyers now turned their attention against the frigate that had advanced more slowly on the Rebel left. Once again, the concentrated Imperial fire was devastating. The Rebel ship passed between the two hulking behemoths, which pounded it from either side. The frigate floated on a little further, when it was suddenly wracked with internal explosions from its overheating reactors. Not many of the crew made it to their escape pods.


The Star Destroyers started to turn about cumbersomely, as the remaining Rebel frigate came about on their rear. The manoeuvre brought the lumbering ships dangerously close and a crash seemed imminent. Claxons begun blaring and junior crew on the command deck exchanged nervous glances. Soon the danger passed though, and the Star Destroyers were re-aligned to take on the remaining Rebel ship. However, the Rebels had had enough of a beating for one day. With laser blasts whizzing by, the Rebel captain engaged his hyper drive. The battle was over.


Saturday, 14 May 2016

Star Wars Armada: First Impressions


A friend of mine showed me how to play Star Wars Armada the other day. I haven't really played any "naval" games before, but was eager to try this one because A) I love Star Wars, B) I've heard good stuff about the game and C) it's a nice change from the games I usually play.

The scenario was a straight forward bash between the "fleets" that come in the core box. I commanded the Imperial forces with a Victory class Star Destroyer and 6 squadrons of Tie Fighters. The Rebel Scum had two smaller main ships - a Corelian corvette and a Nebulon frigate - and 4 squadrons of X-wings. The objective was to cause as much destruction as possible in six turns.


Both sides started by advancing at "medium speed" towards the enemy. My Star Destroyer banked left whle the Tie Fighters moved right to cover that flank. My plan was to destroy the Corelian corvette first with some short range fire from the Star Destroyer while the Tie Fighters would hold the rest of the Rebels at bay.


The game was a learning experience for both of us and we (I) quickly learned that things don't work quite as expected. With the Star Destroyer you really have to plan ahead, as you have to set its commands 3 turns in advance (you still have a bunch off leeway though). The sequence of fire first, move second and the speed of the ships also threw us off, and my approach against the corvette didn't go as planned. Instead, we passed each other with too great speed, trading shots with our turbolasers that caused only minimal damage. Meanwhile, the fighter squadrons approached each other and got tied down in a massive skirmish. The Nebulon frigate started a wide flanking manoeuvre against the rear of my Star Destroyer.


The Star Destroyer weakened the shields of both the Corelian corvette and Nebulon frigate, but soon found both Rebel ships on its rear! The Star Destroyer had trouble turning around, as it was moving too fast (I had given it speed 2 at the start), was cumbersome to swivel and I had completely miss-planned the manoeuvres. My Tie Fighters managed to wipe out the X-wings, but this was little use. The Rebel main ships (particularly the frigate) kept hammering the rear of the Star Destroyer. With the rear shields gone, the vulnerable engines and reactor and of the Star Destroyer started taking hits, some of which were critical. 

With its hull breached and its reactors overheating, the Star Destroyer's command personnel panicked. The behemoth lumbered forward, trailing debris and air. Klaxons were blaring and some of the personnel abandoned ship. Sensing victory, the Nebulon frigate's captain re-routed power from the frigate's engines for a concentrated volley at the Star Destroyer. There was little the Imperial crew could do and the Star Destroyer exploded in a brilliant ball of white light. The Imperium had lost. On some distant moon Ewoks were dancing and (Rebel) order was restored to this small segment of the galaxy.


The game was interesting and fun to play. I quite liked the turn mechanics and the orders given to the ships. Also the combination of main ships with fighter squadrons was nice. Another major source of joy was making little laser sounds every time I got to fire the Star Destroyer and playing relevant YouTube scenes from my phone mid-game. Good times.

That said, the rules were confusingly written and we had to spend a serious amount of time re-reading and cross-refencing them. The main problem is that the rules are split between two books and between various sections of the rules. This might be a good solution for tournament play or for someone who already knows the rules, but for a beginner this was very off-setting. Even for tournament play I think this could be done better.

The game also has a lot of counters, special rules for various ships and add-on cards (which you can purchase to make your ships better) plus very heavy "codex creep" for new ships that Fantasy Flight Games is releasing at a steady pace. This might be a good thing to add flavour to the otherwise "impersonal" ships and a chance to try different "builds" to your fleet to keep things interesting. However, this carries a risk of the game becoming one of micro-management and list optimization, which I don't like.

Anyway, the demo was fun and the game seemed to promise further interesting (and grandiose!) space fleet actions. Like a kid that has just received his allowance, I raced to the nearest games store and bought myself the starter set plus several additions. I am now the proud owner of a fledgling Imperial armada (plus a minuscule Rebel force to use as target practice). Stay tuned for more star fleet action!


Sunday, 6 March 2016

Return to Grimdark

As with most gamers, I originally got into the hobby with Games Workshop's games. These used to be all the rage, and I even worked as a GW salesman for some five years during my studies. Slowly, other games infiltrated my hobby time and my massive Fantasy and Warhammer 40K collections haven't seen any action for the past 3-4 years. It was high time to return to the Grimdark!

We decided to play a 1.500 point game of Warhammer 40K with a good friend, whom I originally met via 40K some 15 years ago. Fortunately he'd been playing the game recently and could inculcate me in the newest set of rules. The scenario pit my loyal Space Marines against traitorous Chaos Marines and their Daemonic allies. The Chaos Marines had desecrated the ruins of an Imperial temple and opened a portal through which they had begun to summon all manner of hellish fiends. My objective was to capture and close the portal. Secondary objectives were to rescue a downed Space Marine pilot and extract a portable monitoring station.

My force consisted of a demi-company of marines from the Raptors chapter (50 space marines following "Codex" organization) led by Chaplain Kerberos. Due to the unholy nature of the mission, this task-force was reinforced by Librarian Nestor and a squad of Terminators, who would be arriving from deep-strike. A squad of Chaos Marines, Keeper of Secrets, Dreadnought and a Maulerfiend were deployed within the temple. Plenty more Chaos filth would be arriving from the warp.


Unholy rites taking place within the desecrated temple

Not a man left behind!

I started the game by rushing forward with most of my army. In the centre, two Tactical squads raced forward in Rhinos, while a squad of Assault Marines hovered closely behind. A third Tactical Squad advanced on my right and rapidly formed a perimeter around the wounded pilot. My Devastators had been split into two 5-man squads and took up good firing positions on either flank.

Devastators take up firing positions

Rhino transports advance under a smoke screen

As soon as my loyalists approached, the forces of Chaos spewed forth from the temple. The Keeper of Secrets took to its wings and started casting nasty spells on my forces. The daemonic war-engines rushed for my marines, with the Maulerfiend ripping open one of the Rhino transports. A second Rhino was fortunately protected by the smoke screen.

Chaos monstrosities spill forth and rapidly wreck the one of the Rhinos

Unperturbed, my marines raced forward to secure the temple. Supported by Nestor's deep-striking terminators, a squad of tactical marines and a squad of assault marines stormed the temple and knocked out the Chaos Dreadnought and most of the Chaos Marines. Purple fires flickered and black shadows flashed at the edge of the marine's vision as reality was ripped asunder. In an instant, these shadows had materialized into a might Daemon Prince and a great score of lesser daemons.

The daemons unleashed horrible psychic attacks on the marines, who stood their ground and unleashed a storm of sanctified bolter rounds and flamer gushes at the daemons. This did not deter the unholy daemons, who assault the loyalist marines both within the temple and near the secondary objectives.

Space Marines storm the temple

Daemons emerge...

... and more daemons ...
... and more daemons!

Furious combat erupts on the objective

In a few graceful strides, the Daemon Prince was upon Nestor and his bodyguard. The ancient Space Marine Librarian knew what was coming, said a few blessed words and readied his force axe and storm shield. The Space Marine hero parried the Daemon's strokes, but that was all he could do. The Daemon moved with unholy speed and even with the gift of psychic foresight, the Librarian was hard pressed to keep up. The parries were becoming ever more sluggish, until the revered Space Marine hero finally missed his mark. The Daemon Prince's blade sliced through Nestor's armour like a knife through butter. At first, the cut seemed pleasant, even rapturous. The caress of the daemonic sword was fickle though and, in the blink of an eye, the sensation became one of utmost agony. The Librarian died screaming.

A struggle of titans

The lesser daemons infesting the temple were eliminated after a short combat, after which the remaining marines turned to assist the beleaguered Librarian. The succour came too late and the marines were forced to watch as their champion was struck down. With a savage scream, Chaplain Kerberos led the tactical and assault marines against the Daemonic monstrosity. The Daemon Prince struck down a great many of the marines, but there were simply too many of the Emperor's Finest. In the end, the daemonic monstrosity was overwhelmed and sent back to the Warp.

The Daemon Prince is overwhelmed

The Daemonic incursion had been repelled in other sectors as well, and the Space Marines now controlled most of the battlefield. The few remaining Chaos Marines fled the field and the Space Marines proceeded to despatch the few remaining daemons from this world. Chaplain Kerberos hurriedly closed the Chaos portal and started the arduous process of re-sanctifying the temple with blessings and holy seals. This incursion had been stopped before it could get out of hand, but where would the arch-enemy strike next?